Sunday, December 19, 2010

Fairyland Paperweight

Hi everyone,

This is a present I made for my friend Sherry Mendoza for Christmas, it's a little diorama of a fairy sitting in a garden. It's a one of a kind as I haven't got another container like this, I can't tell you were I got it from sorry.

It was very hard for me to give it away as I'm very critical of my creations, but I was very happy how it turned out and I knew she would appreciate it and love it, that's the thrill of giving things away isn't it!


It's not very big as you can tell by the picture with the 50c piece in it.

Oh by the way.... Sherry absolutely love it!! Yeah!!

Sorry about the pictures, one day I'll get a better camera :-)

Thanks for looking
Cheers
Jane

Friday, December 17, 2010

Christmas Gifts

Hi everyone,

It's that time of year again where you run around trying to get everything done! I was up until 1am making these gifts for some lovely ladies at work. The pots are paper mache ones from Spotlight, I covered them with Echo Park Merry Christmas papers, popped a cellophane bag of lollies in them then create a tag cut from one of the papers, very easy!! But why do these ideas come to me late at night??


The ladies loved them so I'm now off to make more! I'm on holidays now so I have lots more time to create, I'm actually working on one right now for a special person, will share soon!

Thanks for looking.

Cheers
Jane

Thursday, December 2, 2010

Teaching at Pages2Scrap Saturday 4th Dec

Hi everyone,

I'll be at Pages2Scrap this Saturday teaching 5 Christmas cards using alcohol inks, Scrapware mini chipboard and acrylic pieces and ribbon. Very easy cards to create but very stunning, if i don't say so myself LOL.

So if you're around Tuggerah NSW way, do pop in and say hello! It's a fantastic shop with lots and lots of goodies!!


Here is a sneak peek of one card in my class.


Cheers

Jane

Tuesday, November 23, 2010

Altered standing mirror

Hi everyone,

While I was out shopping last weekend for Christmas presents I came across this plastic mirror for $5, what a bargain! I just had to buy it and take it home to alter . I didn't get much Christmas shopping done unfortunately as my mind was obviously elsewhere he he.

I coated the tacky silver colour with Alcohol Inks, added flowers that I bought at the Penrith Papercraft show and some of my secret stash of vintage blooms, a Crafty Secrets collage picture and ZVA rhinestone leaves. The little metal charm is Pink Paislee.


I have no idea what I'm going to do with it, any suggestions? Maybe I can give it away as a Christmas present LOL. I can't display it in my vintage lounge room anymore as it now houses a giant TV, oh well.

Thank for looking
Cheers
Jane

Sunday, November 21, 2010

More Scrapware pieces - Chipboard

Here are some of the Scrapware chipboard pieces I did for display at the Penrith Papercraft Festival that was held at the beginning of the month.


The Canvas of my beautiful daugther 'Eliza' was embossed with American Craft 'Zing' embossing powders, all the chipboard pieces were embossed actually, the dragonfly's body and the background circle piece were stamped with a text image while the embossing powder was still hot, I used a VersaMark ink to help release the stamp after stamping it.

I coloured all the chipboard pieces on the owl card with my Copic markers, they will soak up your markers so don't do this too often, unless you have re-inkers of course he he.

Hope you like them all and thanks for looking.

Thank you once again Angela for asking me.

Cheers Jane

Scrapware Jewellery pieces

Hi everyone,

I was very honour to have Angela from Scrapware ask me to play with some of her products and her NEW acrylic pieces.


I used Tattered Angels Glimmer Glaze on the back of the pieces, I covered the whole surface with a mix of three glazes, heated it with my heatgun until it bubbled and turned black just about, when I turned it over I was amazed to discover the stunning effect and colours that was produced, just gorgeous!

The first one, I left untouched so it looks translucent, the second and third ones I painted over the dried glaze with a silver Krylon pen, I also went around the edges. The fourth, I glued a piece of Webster's Pages paper on one side using Glossy Accents then added ZVA pearls around the edges.

I had so much fun making these and the acrylic pieces withstand the heat brilliantly! I have made many more since and given them away. I hope I explained it well, any questions just ask me :-)

Thanks for looking
Cheers
Jane

Thursday, October 21, 2010

Glimmermist card

Hi everyone,

It's the weekend, well it is for me he he and you know what that means - creating time Woohoo!!

Here is the card I taught last weekend at the 'Stamping and Friends' stamp camp, what a great bunch of ladies, I had so much fun and it even snow Yep in Mt Victoria NSW. I have stayed there twice now and both times it has snowed!

Anyway here is how I made the card. I cut 20 layers of old text paper into flower shapes, attached them altogether with a decorative brad and spray it with Brick Glimmermist. A good tip is to scrunch the petals up more using your fingertips when it's wet, this adds more depth to the flower. The white CD - I placed a Tattered Angels screen over it and spray it with Forest Green Glimmermist then stamped a text image over the top with StazOn timber brown. I added Tim Holtz tissue tape (love this), a ticket and some lace, how easy hey and all the ladies cards looked fantastic!!


Hope you like it, I had so much fun teaching it!!

Cheers and see you soon with more.

Jane

Monday, October 4, 2010

Donna Salazar stamp

Hi again,

I was also given this delightful Donna Salazar stamp to play with, as you all should know by now... I really love images of birds, but they frighten the living daylights out of me in real life LOL.


I stamped the image on DCWV Linen Closet paper using Archival sepia ink, cut it out and layered it on more Linen Closet papers. Added a collection of trimmed flowers from one of the glittered papers, NEW Green Tara beaded flowers (soooo in love with these), Prima flower, aqua flower and another flower I made from Tim Holtz tissue tape then I added a Prima pebble in the centre of it. Oh, I also filled in gaps with Webster's Pages cream trim cut into individual pieces with a pearl in the centre.
The quote stamp is a Stampin' Up one, not sure if it's still available.

If you ever want to find out more about the cards then please just ask, I just don't want to dribble on too much he he. Isn't it a gorgeous stamp though, I can see myself using this one a lot!!

Cheers
Jane

Cards using Unity Stamps for Scrapbook Royalty

Hi everyone

Well I have lots to share with you, yeah I hope I hear you say LOL!!!

I was very lucky that my friend Sherry Mendoza bought these beautiful sets of stamps home for me to play with, boy was I so excited as I just love Unity Stamps and these sets are very special. They're designed by Unity Stamp Company and Melody Ross, 100% of the proceeds is donated to Scrapbook Royalty. The funds have helped over 40 foundations so far, read all about it here on their blog.

Here are four cards that I have made so far.


One of the stamps has a lovely bird with a quote 'Life is beautiful' running down it's back. I stamped it on Webster's Pages paper using brown ink then trim them so I had two separate pieces. I layered them on more Webster's Pages papers then on folded Core'dinations card, added some lace and a Zva Creative flower.


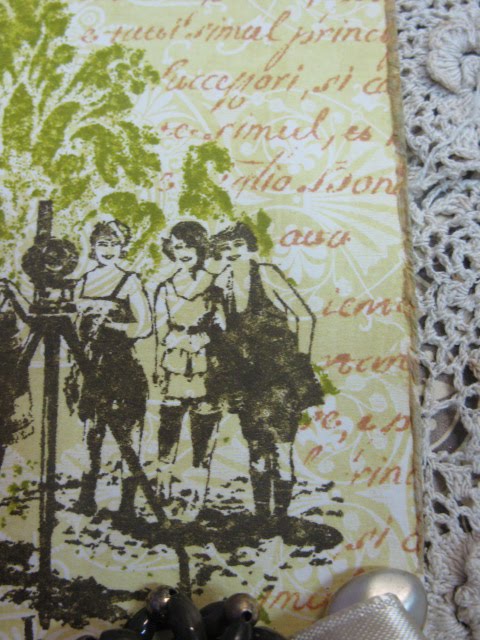
I stamp and clear embossed the image on cream card, then sprayed a combinations of Glimmermists over the top. I placed a piece of white paper over the image, then a clean tea towel over them, I ran a hot iron over them, this made the embossing image melt into the white paper creating a faux bleach image or some called it the Faux batik technique. I used Prima butterflies to further decorate the card.


I clear embossed this image as well, sprayed the Glimmermists over the top but left it at this stage. I cut out the doily from the packaging from the Prima butterflies because I liked it LOL. Further decorarted the card with an vintage orange ribbon I had and one of the butterflies.


I love this quote 'Just be You', I stamp it on a Cosmo Cricket Pixie Licious label using green ink, Layered it on My Yellow Bicycle papers and further decorated it with Webster's Pages cream trim, flowers that Sherry gave me and a Prima flower.

I hope you like them...I've got lots more to share, so hang around!!

Cheers
Jane

Thursday, September 23, 2010

Class at Pages2Scrap 25th Sept

Hi everyone,

I'm just a bit excited because I will be teaching a class at Pages2Scrap in Tuggerah NSW this Saturday. A cool technique that I'm sure you'll enjoy! I'm also excited to be able to finally check out this shop and to meet Tracey and Alex again. So if you're in the area please pop in and say hello!

I'll tell you all about it and share some pics!

Cheers
Jane XX

Tuesday, September 14, 2010

Toilet roll flowers!

Hi everyone,

Yes toilet rolls, you read that right LOL. I saw these in a delightful book by Sandra Evertson called Fanciful Paper Flowers and just had to make some. They're very easy, I demonstrated them for the 'make n take' at Stampabit last Saturday.


This is how I made them, not exactly to the book though LOL.

1. Trim the rolls to 10mm in thickness
2. Colour the outside with Brilliance moonlight white ink pad.
3. Spread PVA glue on cardstock to a size just larger than the toilet roll shaped petal.
4. Dab the toilet roll petal onto the PVA glue and place it on the correct side of your pattern paper (I used Prima Annalee Poetry). Let this dry.
5. When dry trim around the petals and arrange five of them together in a flower shape.
6. Add PVA glue where the petals touch each other and allow to dry once again.
7. Further decorate the centre with a piece of pink tulle, punch text flower and a small bunch of forget-me-not flowers.

I attached a large magnet at the back of mine, but you could attach a peg to clip in onto something or even attach to a project? Even make a hanging mobile with them. Don't you just love that you can see the bar-code inside the rolls, adds a real shabby effect don't you think LOL.

Hope you make one!

Cheers
Jane

Tuesday, August 31, 2010

Catch up time!

Hi everyone,

I'm still here and I have been creating, just can't share much on here yet LOL.

I've just came back from a lovely weekend in Melbourne with my hubby for my birthday. He booked a hotel that was nice and close to the Paperific show that was on, how sweet is that!
The rest of the time we spent shopping in the city, WOW what an inspirational place it is, I came home all inspired with lots of projects in my head to do LOL. The trip actually reminded me that I haven't shared this card that I did for my Dad's birthday with you. I saw this printed masking tape from mt deco everywhere in Melbourne, it's quite a cool product to play with, I used it as ribbon along the bottom of the card, scrunching it up creates great texture too! The stamp I used is an Art Impressions and I did the brushless water colour technique - this is where you dab your inkpads onto the rubber and then lightly spray a fine mist of water over it and stamp, I love this technique. Unfortunately it was my Dad's birthday in June and I still haven't sent the card oops!! sorry Dad XX


I plan on creating all this weekend so watch out!! LOL

Cheers
Jane

Monday, August 9, 2010

A few cards I have made lately

Hi everyone,

I've had a busy creative month, made lots of birthdays cards and some for the magazine plus other secret special projects he he, will tell soon!

Here are two cards for the moment. As you can see I still love colouring with my Copic markers!!

One card was for my husband, that's using a Papermania stamp set and the other card I made for my son - Thomas, it's a The Greeting Farm stamp.


I shall update again very soon with more, keep posted.

Cheers
Jane

Monday, July 12, 2010

Metallic StazOn ink card

Hi everyone,

I saw these new StazOn metallic ink pads and just had to have them! I had a little play yesterday and came up with this card, hope you like it.
I stamped Hero Arts black and white flowers stamp on acetate using the silver metallic ink pad and wow I just love the effect. I coloured behind the images using Copic markers and layer it on an old text page using glue in inconspicuous places, decorated it further with ribbons, ZVA sweet blossom sprayed with Glimmermist vanilla breeze and a punched butterfly.


Well I'm off to try the other two colours I got - Platinun and bronze mmmm yum!

Thanks for looking
Cheers
Jane

Saturday, June 26, 2010

Stamping on fabric

Hello there

Okay, that's been enough of me showing my cards I made using the masking technique, this card I made to show how to stamp on fabric.

First I placed a Tattered Angels screen over my silk fabric covered card (from a wedding invitation shop, don't know which one as my friend gave it to me) and spray it with a light pink Glimmermist in the centre then a darker shade around the edge, if you would like extact colours just ask, I know I'm being lazy he he. I dried it with a heat gun then stamped a darkroom door flower from the Flower Friendship collection on it a few times using StazOn timber brown ink, the verse on the calico fabric strip is from the same set. The leaves are a clear two step stamp set from We R Memory Keepers, I used StazOn timber brown and olive green inks on calico fabric and cut them out, I arranged these on the card with a Prima Flower and some bling!

I found StazOn inks works well on fabric but there is VersaCraft (Ex fabrico) inks, these are designed to work on fabric and wash well, no I'm not going to wash my card he he. Anyway why don't you have a go!

Hope you like it.


Thanks for looking again.
Cheers
Jane

Friday, June 25, 2010

Eliza masked card

Well I jinxed myself didn't I he he! I didn't post a card yesterday, but I did have a good excuse as it was hubbies birthday and we went out for dinner LOL.

Anyway, this is yet another card I made for the convention to show the great effects of masking. I stamped the letter 'e' then made a mask for it then stamped the letter 'l' and made a mask for that, so on and so on until I had spelled 'Eliza' and it was all masked, I used VersaMagic red ink. I then stamped an American craft rose image over the top in a few areas with my Archival Ink sepia, I love this rose image as it looks good even without having to colour it. The other good thing about this card is that Eliza's birthday isn't until August, yeehaa I'm early for once LOL.


Thanks for looking :-)
Cheers
Jane

Wednesday, June 23, 2010

Deer masked card

Wow three days of posting in a row woohoo!

Okay, this is another masked card I did for the Convention. I've used a Hero Arts deer stamp, isn't it so cute!!. I stamped the deer on cream card, covered it with a mask then stamp the deer again over the top, I repeated this twice more (four deers in total) to create a herd of deers! I sprayed green Glimmermist onto a tree Glimmer screen and place this over the top of the masked deers, it's a great way to use your screens (as a stamp). I trimmed around the top of the herd and inserted a journalling tag then added words.
Why not have a go yourself and turn a single stamp into a group of them, it's cool don't you think!


Thanks for looking again, let me know if you have a go. See you tomorrow LOL (fingers crossed that I haven't jinxed myself now he he)

Cheers
Jane

Tuesday, June 22, 2010

Masked vintage card

This is another card I made using the masking technique. First I stamped Inkadinkado 'Smiling right back at you' on light coloured pattern paper using dark brown ink, covered this with a mask then stamped Tim Holtz damask over the top with green ink, then I masked this and finally stamped over these with Stampmania text stamp a couple of times with light brown ink. I layered the image on a cream doily, I just love doilies, you probably know that by now he he. The flower trim is Webster's Pages Bloomer trim in green, I absolutely love this too!


Thanks for looking
Jane

Monday, June 21, 2010

Cards I made for the Brisbane Papercraft Convention 2010

Hi everyone,

Well I've been very busy lately, but life should calm down a bit now and I'll be able to share more of my creations with you. Last weekend I was teaching at the Brisbane Papercraft Convention, what a thrill that was, to be asked in the first place and then to teach such lovely ladies!

I also got the chance to do two Studio Talks. One was 'Stamping on different mediums' such as fabric and acetate, I actually had to demonstrate this using one hand as the other was holding the microphone. I did very well I must say, no images were smudged he he!! The other technique was Masking and the last was different ways to jazz up your chipboard!

I thought I would share one of my cards each day for the next week or so, just to keep you inspired (hopefully!).

Masking has been around for many years and it's one of those stamping techniques that you forget about. But since there are new stamps and other items on the market I thought I would have a play again. I had so much fun, why don't you give it a try. You simply stamp your selected image on your card then again on scrap paper, cut out the scrap image inside the lines then attach this over your original one using re-positional tape. If you would like step by steps let me know and I'll post them for you.

In this card I used the little boy from October Afternoon Fly A Kite collection, made a mask for him then stamped Rubberdabbado A113WC Trees over the top, finally I applied an October Afternoon Fly A Kite rub-on over the top to finish!


Thanks for looking, see you tomorrow with another card!

Cheers
Jane

Wednesday, June 2, 2010

Shading with Copics

Hi everyone,

Well I did promise this card last week, but with organising a Stamp Camp, shop, work and organising classes I was just a little bit busy, sorry.

Anyway, I just wanted to share this card with you. I created shadows by shading over the pattern paper using my B60 Pale Blue Grey Ciao Copic, this is a great way to create more depth to your images. Be careful as the paper can soak up your Copics!

The stamp is Inky Antics P5-10055-K and I used My Mind Eye paper. I also cut a piece of the Prima packing from the Debutantes lovely lilac flowers that had the word 'Courage' on it, I coloured it with a purple copic Marker. Being Alcohol based markers they dry quickly and it's a great way to add colour.
I added three-dimensional medium (glossy accents) to create raindrops over the image and then added kindyglitz crystalina to the flowers for more pizazz.


Sorry there are no images, this card is being published in Cardmaking, Stamping & Papercraft magazine Vol 16 No 9, very exciting!!!!


I hope you like it and thanks for looking
Cheers
Jane

Sunday, May 23, 2010

Altered handbag using alcohol inks!

My Dad gave me this little handbag in a box of goodies that he collected for me, it had broken jewellery, chains and all sorts of bits and pieces that will be popping up on here from time to time.

This handbag is made from plastic and is probably from a $2 shop but I had an idea for it!! I covered the gold colour using Ranger Alcohol Inks - Espresso, butterscotch and currant, then used October Afternoon stickers, Webster's page bloomer trim (my favourite at the moment!), Prima flowers and a few other little embellishments.

BEFORE


AFTER
Sorry for no image as this item in being published! It's actually going to be in Scrapbooking Memories Vol 12 No 11 Woohoo!!


Anyway, hope you like it.

I'll be posting again in the next couple of days to show you a card I made using Copic Markers, two ideas which I'm sure you will love!!

Cheers
Jane

Thursday, May 20, 2010

Why I love all things old!


I went and visited my Dad last weekend in Glen Innes NSW, while I sat in his sitting room it suddenly came to me why I like old items - his place is full of them and I just love them all!! Dads place is like walking into a second hand antique shop, filled with wonderful, quirky nicnaks everywhere!! He really loves the colour red and has two of these stunning red chandeliers in his sitting room, most of the items in that room are red, it's such a happy colour. I thought I would share some photos with you which have sparked inspiration in me. I'm going to make a mini album for Dad with pictures of these wonderful pieces in it, maybe I should make one for me too!!

Back soon to share some creations!!

Head on over to my new blog page!

Hi everyone, Thanks for following my journey on this domain but I now have a new blog site, so please follow the link below for another...